Pure Water Annie’s Extra-Simple Instructions for Changing Filter Cartridges in Standard Drinking Water Systems
This article addresses cartridge change for water filters and reverse systems with standard filter housings, like those pictured below. If you have a proprietary (unique) system like Aquasana or Multipure, you’ll have to figure out how to get the unit apart, but the rest of the instructions apply in a general way.
Some things that you’ll want to have on hand before you start, in addition to the replacement cartridges: a filter wrench, if needed, replacement O rings (though you may not need them), and silicone lubricant, though you won’t need this, either, if the O rings seem sound and sufficiently lubricated. Also, a pan or, better, a towel to catch drips. A flashlight to look for leaks is also nice to have.
To start, turn off the water that goes to the water filter and lock open the faucet. If no water is coming out of the faucet, it’s safe to open the housing to change the cartridge. With reverse osmosis units you need also to turn off the valve on top of the storage tank. (If your RO unit has no shutoff valve on the tank, you’ll have to let all of the water drain out of the tank. While it’s draining, you’ll have time to reflect on the folly of buying the cheapest RO unit you could find.)
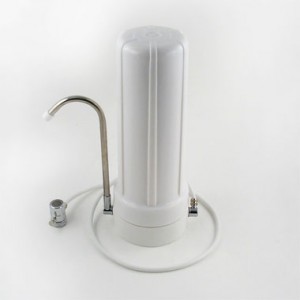
With the countertop housing shown above, the sump (the long part of the housing) sits on top of the base.
Next, open the filter housing(s). The long part of the housing, called the sump, screws off of the short part (the cap for undersink units, the base for countertop). Turn it counterclockwise to remove it. You should have a filter wrench to make the job easy. Countertop units are often hard to get apart because they aren’t stabilized on a bracket and the wrench doesn’t help. The best strategy with stubborn countertops is to make opening the housing a two-person job, each person using both hands on one part, the cap or the sump. With multi-cartridge units, it’s a good idea to remember, or even mark for future reference, the order that the sumps are arranged in so that you can keep the filters in proper order.
Standard undersink housing. The cap is on top and the bottom part, the sump, screws off counterclockwise.
<
- Remove and replace the cartridge(s). Except for “candle-style” filters like Doulton, which screw into the cap/base of the housing, cartridges will fall out of the sump when you dump the water into a sink. It’s a good idea with some cartridges to notice which end goes into the sump first With others it doesn’t matter. With most radial cartridges (like carbon blocks), both ends of the cartridge are open and there is no up or down to worry about. With most axial cartridges (like hard-shelled “media” cartridges that contain granular media), up and down do matter. As a general rule, with hard-shelled cartridges there will be only one end gasket: if that’s the case, point the gasket end toward the base or cap. With axial cartridges, if you get it backward, no water will come out when you turn the filter on. Before replacing the cartridge, it’s a good idea to examine and replace, if necessary, the sump O ring that makes the seal between the cap and seal. This is also a good time to lubricate the O ring with silicone grease if necessary.
With filters, you are essentially finished at this point. With the ledge faucet still open, turn on the water and watch for leaks. You’ll hear the hissing and gurgling of air being expelled from the unit. This is normal. Let the water run from the open faucet for three or four minutes to rinse the new cartridge(s) and allow air to escape while you check for leaks. Water may appear milky for awhile, even after rinsing. This is caused by air still trapped in the unit. It’s nothing to worry about, and it will work its way out eventually.
With RO units, you’re not through yet. After you’ve turned on the water, listened to some hissing and gurgling, and determined that there are no leaks, open the valve on top of the storage tank and let all the water run from the tank through the faucet. (Since the inlet is on and the unit is making water, when the tank is empty you’ll still have a trickle or a fast drip coming from the faucet. This is the water the unit is making in real time.) The tank should feel light and empty. If it doesn’t empty completely, you need to add air to the tank. (Go here for tank instructions.) When the tank has emptied, close the faucet and let the unit begin collecting water in the tank. You can use the water at any time, but you won’t have a lot of water for a few minutes. If your RO unit has no tank valve and you’ve emptied it previously, you’ll have to let the tank fill completely, then empty it again completely to rinse the final filter. While it is emptying, remind yourself again to pay a bit more for a unit with a tank valve the next time around.


![fh001[1]](http://purewatergazette.net/blog/wp-content/uploads/2013/06/fh0011-168x300.jpg)
